NCM-MCI Exam Labs | Latest NCM-MCI Test Cost
Wiki Article
P.S. Free & New NCM-MCI dumps are available on Google Drive shared by ExamsTorrent: https://drive.google.com/open?id=1hVqpzulM0phCxESNOBxkZNp7NJK0KW5-
NCM-MCI Learning Materials will be your best teacher who helps you to find the key and difficulty of the exam, so that you no longer feel confused when review. NCM-MCI learning materials will be your best learning partner and will accompany you through every day of the review. It will help you to deal with all the difficulties you have encountered in the learning process and make you walk more easily and happily on the road of studying.
One of the reason for this popularity is our study material are accompanied by high quality and efficient services so that they can solve all your problems. We guarantee that after purchasing our NCM-MCI test prep, we will deliver the product to you as soon as possible about 5-10 minutes. So you don’t need to wait for a long time or worry about the delivery time has any delay. We will transfer our NCM-MCI Test Prep to you online immediately, and this service is also the reason why our NCM-MCI study torrent can win people’s heart and mind.
Latest NCM-MCI Test Cost & NCM-MCI Valid Test Experience
Our company is trying to satisfy every customer’s demand. Of course, we also attach great importance on the quality of our NCM-MCI real test. Every product will undergo a strict inspection process. In addition, there will have random check among different kinds of NCM-MCI Study Materials. The quality of our NCM-MCI exam quiz deserves your trust. Most of our customers are willing to introduce their friends to purchase our NCM-MCI learning dumps.
Benefits Of The Nutanix Certified Expert
Nutanix Certified Advanced Professional (NCAP) is an industry-recognized certification that validates a candidate's technical skills with the Nutanix Enterprise Cloud Platform. Achieving NCAP demonstrates proficiency in the design, implementation, operation and troubleshooting.
Nutanix Certified Expert (NCA) is an industry-recognized certification that validates a candidate's technical skills with the Nutanix Enterprise Cloud Platform. Achieving NCA demonstrates proficiency in the design, implementation, operation and troubleshooting of Nutanix Enterprise Cloud solutions.
NCA is intended for a candidate that has 3 to 6 months' hands-on experience with Nutanix software and is typically a system engineer or similar role.
Do you want to pass the Nutanix NCM-MCI Exam?
The Nutanix NCM-MCI exam questions are available in different formats. You can either take Nutanix NCM-MCI Practice Test at a web based platform, or you can purchase for the Nutanix NCM-MCI practice test software. If you feel that you can learn better by training than you can go for the Nutanix NCM-MCI exam dumps. However, if you feel that practicing is the best mode of learning then you can go for the Nutanix NCM-MCI training tools.
It is to be noted that the Nutanix NCM-MCI exam objective may change anytime, and we highly recommend you to keep visiting this site on regular basis so that you do not miss any update.
Nutanix has always been known as one of the leading providers in information technology sector. The professionals who wish to make their career in IT industry must have to pass the Nutanix NCM-MCI exam questions because they are highly recognized by all IT companies.
Nutanix Certified Master - Multicloud Infrastructure v6.10 Sample Questions (Q16-Q21):
NEW QUESTION # 16
Task 16
Running NCC on a cluster prior to an upgrade results in the following output FAIL: CVM System Partition /home usage at 93% (greater than threshold, 90%) Identify the CVM with the issue, remove the fil causing the storage bloat, and check the health again by running the individual disk usage health check only on the problematic CVM do not run NCC health check Note: Make sure only the individual health check is executed from the affected node
Answer:
Explanation:
See the Explanation for step by step solution
Explanation:
To identify the CVM with the issue, remove the file causing the storage bloat, and check the health again, you can follow these steps:
Log in to Prism Central and click on Entities on the left menu.
Select Virtual Machines from the drop-down menu and find the NCC health check output file from the list. You can use the date and time information to locate the file. The file name should be something like ncc-output-YYYY-MM-DD-HH-MM-SS.log.
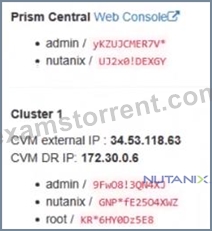
Open the file and look for the line that says FAIL: CVM System Partition /home usage at 93% (greater than threshold, 90%). Note down the IP address of the CVM that has this issue. It should be something like X.X.X.X.
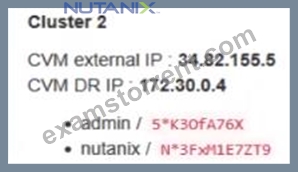
Log in to the CVM using SSH or console with the username and password provided.
Run the command du -sh /home/* to see the disk usage of each file and directory under /home. Identify the file that is taking up most of the space. It could be a log file, a backup file, or a temporary file. Make sure it is not a system file or a configuration file that is needed by the CVM.
Run the command rm -f /home/<filename> to remove the file causing the storage bloat. Replace <filename> with the actual name of the file.
Run the command ncc health_checks hardware_checks disk_checks disk_usage_check --cvm_list=X.X.X.X to check the health again by running the individual disk usage health check only on the problematic CVM. Replace X.X.X.X with the IP address of the CVM that you noted down earlier.
Verify that the output shows PASS: CVM System Partition /home usage at XX% (less than threshold, 90%). This means that the issue has been resolved.
#access to CVM IP by Putty
allssh df -h #look for the path /dev/sdb3 and select the IP of the CVM
ssh CVM_IP
ls
cd software_downloads
ls
cd nos
ls -l -h
rm files_name
df -h
ncc health_checks hardware_checks disk_checks disk_usage_check
NEW QUESTION # 17
Task 14
The application team has requested several mission-critical VMs to be configured for disaster recovery. The remote site (when added) will not be managed by Prism Central. As such, this solution should be built using the Web Console.
Disaster Recovery requirements per VM:
Mkt01
RPO: 2 hours
Retention: 5 snapshots
Fin01
RPO: 15 minutes
Retention: 7 days
Dev01
RPO: 1 day
Retention: 2 snapshots
Configure a DR solution that meets the stated requirements.
Any objects created in this item must start with the name of the VM being protected.
Note: the remote site will be added later
Answer:
Explanation:
See the Explanation for step by step solution
Explanation:
To configure a DR solution that meets the stated requirements, you can follow these steps:
Log in to the Web Console of the source cluster where the VMs are running.
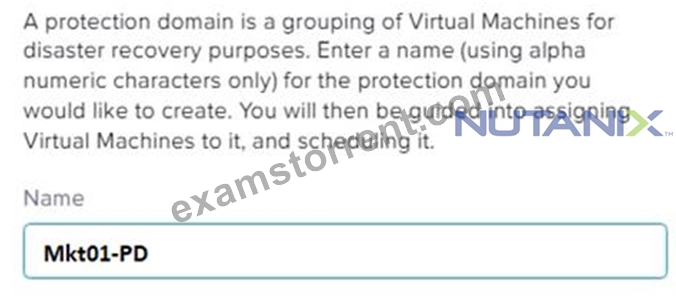
Click on Protection Domains on the left menu and click on Create Protection Domain.
Enter a name for the protection domain, such as PD_Mkt01, and a description if required. Click Next.
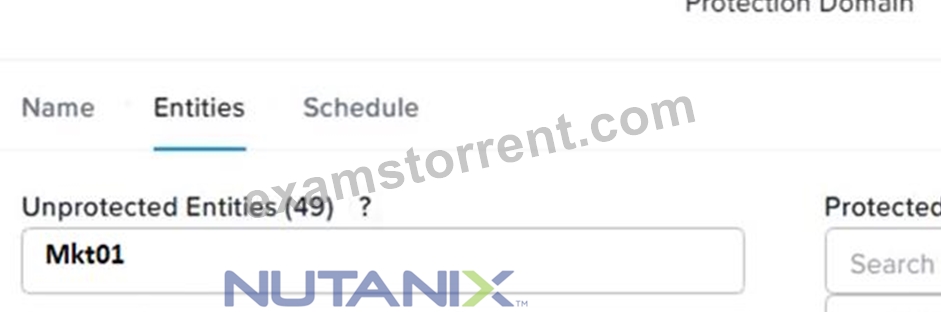
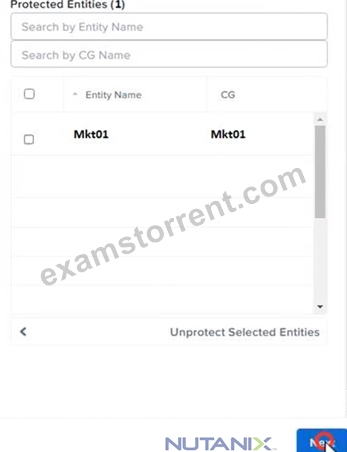
Select Mkt01 from the list of VMs and click Next.
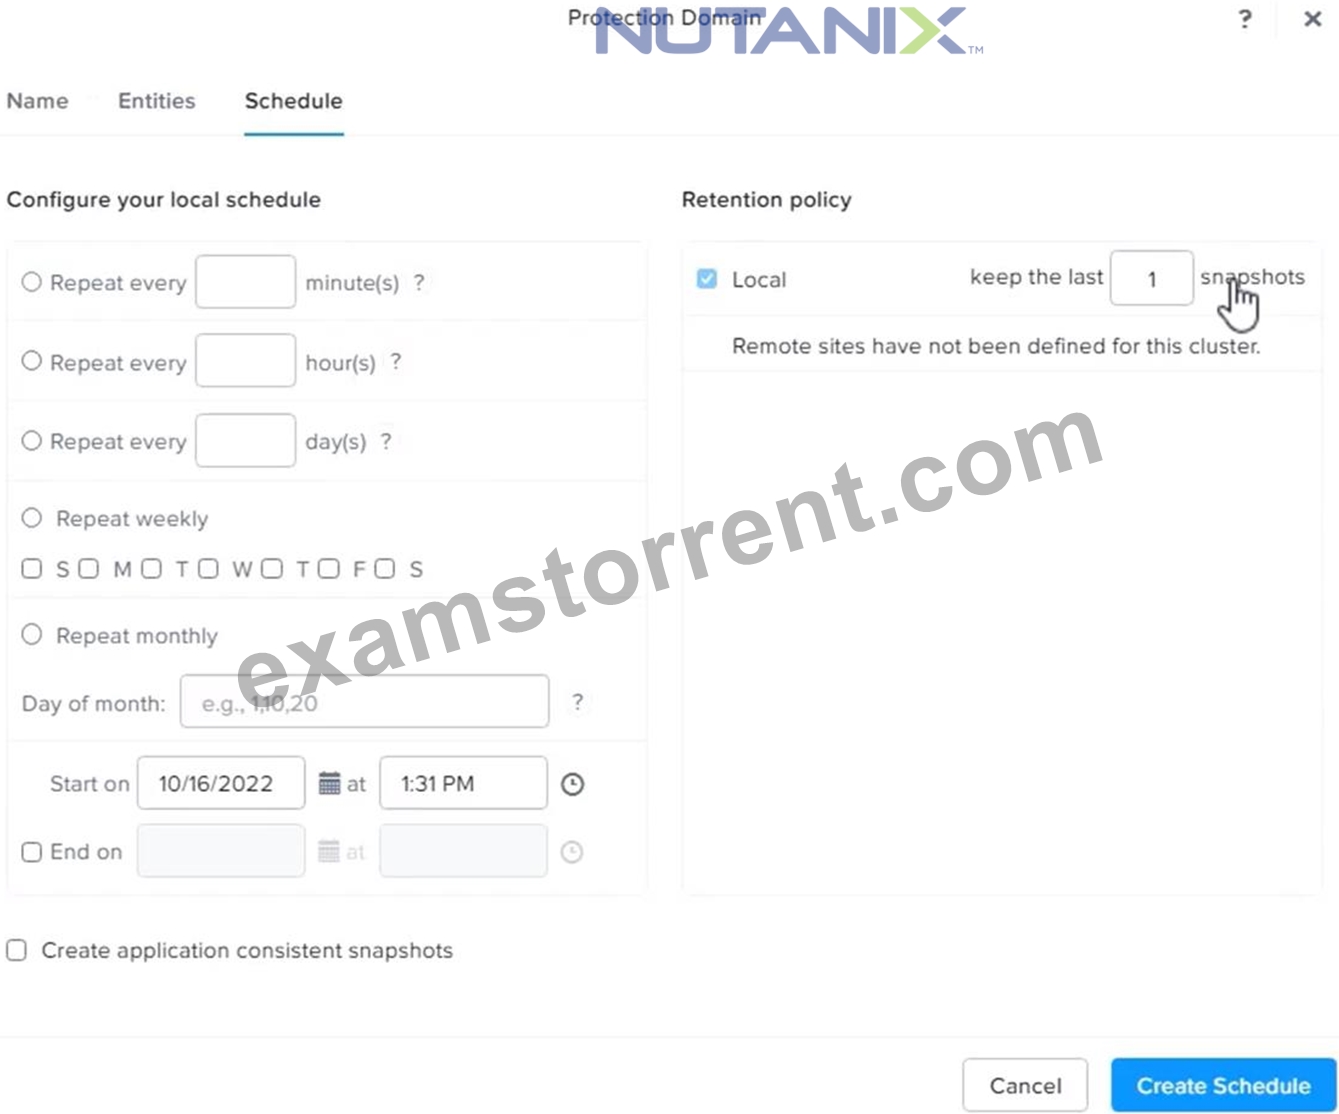
Select Schedule Based from the drop-down menu and enter 2 hours as the interval. Click Next.
Select Remote Site from the drop-down menu and choose the remote site where you want to replicate the VM. Click Next.
Enter 5 as the number of snapshots to retain on both local and remote sites. Click Next.
Review the protection domain details and click Finish.
Repeat the same steps for Fin01 and Dev01, using PD_Fin01 and PD_Dev01 as the protection domain names, and adjusting the interval and retention values according to the requirements.


NEW QUESTION # 18
Refer to the exhibit.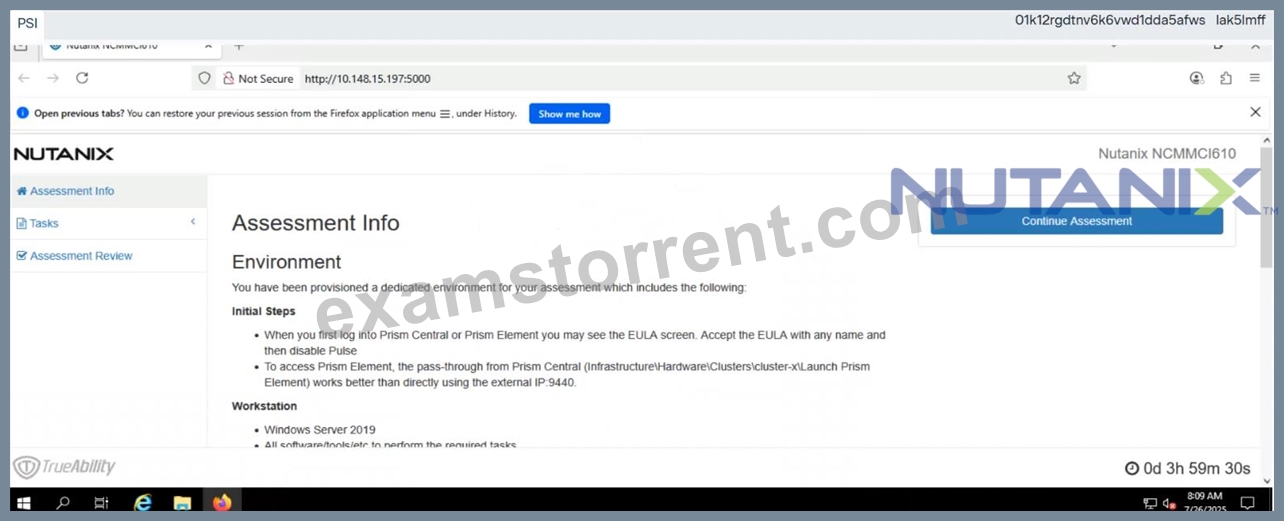
Task1
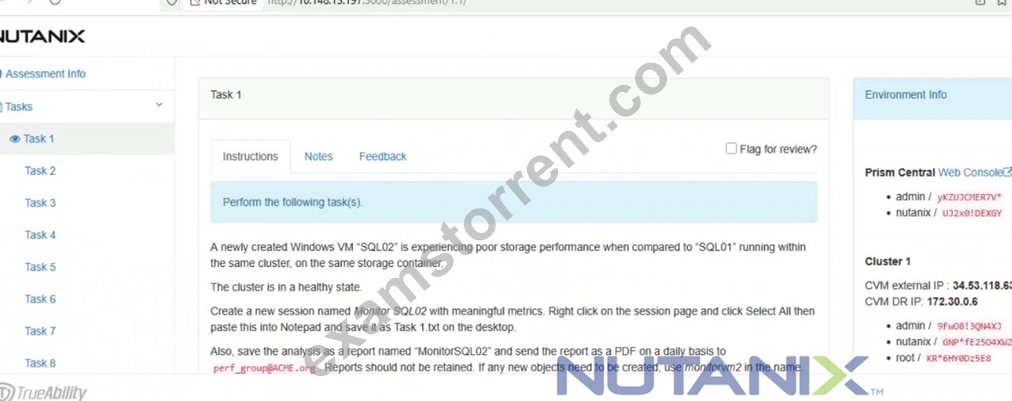
A newly created Windows VM "SQL02" is experiencing poor storage performance when compared to "SQL01" running within the same cluster, on the same storage container.
The cluster is in a healthy state.
Create a new session named Monitor SQL02 with meaningful metrics. Right click on the session page and click Select All then paste this into Notepad and save it as Task 1.txt on the desktop.
Also, save the analysis as a report named "MonitorSQL02" and send the report as a PDF on a daily basis to [email protected]. Reports should not be retained. If any new objects need to be created, use monitorvm2 in the name.
Finally, correct the issue within "SQL02"
Notes:
Do not power on the VMs.
While you will be creating a session, you will need to examine the VM configurations to determine the issue.
Do not delete the VM to resolve the issue, any other destructive change is acceptable
Answer:
Explanation:
See the Explanation
Explanation:
This is a classic Nutanix performance troubleshooting scenario. The issue is almost certainly that the VM was created using the wrong Disk Bus Type (IDE or SATA instead of SCSI).
Here is the step-by-step solution to complete Task 1.
Part 1: Analysis and Reporting
Create the Session
Log in to Prism Central (or Prism Element, depending on the exam environment, but Analysis is usually a PC feature).
Navigate to Operations -> Analysis.
Click New Session.
Name: Monitor SQL02
Entity: Search for and select the VM named SQL02.
Metrics: Since the issue is storage performance, search for and add these specific metrics:
Hypervisor IOPS (or Controller IOPS)
Hypervisor IO Latency (or Controller IO Latency)
Hypervisor IO Bandwidth
Click Save.
Save Session Data (Task 1.txt)
Open the "Monitor SQL02" session you just created.
(Per instructions): Right-click anywhere on the chart/data area -> Click Select All.
Copy the selected text (Ctrl+C).
Open Notepad on the provided desktop.
Paste the data.
Save the file as Task 1.txt on the Desktop.
Create and Schedule the Report
While still in the Analysis session, click the Create Report (or "Add to Report") button.
Report Name: MonitorSQL02
Report Settings:
Format: PDF
Frequency: Daily
Email Recipient: [email protected]
Retention: 0 (or "Do not retain", as requested).
Note: If the system forces you to create a new Report object and MonitorSQL02 is rejected, use monitorvm2 as the name per the instructions.
Save/Schedule the report.
Part 2: Diagnose and Fix the Issue
The Issue:
VM SQL02 was likely created with its data disks set to IDE or SATA.
Why this causes poor performance: IDE/SATA are emulated hardware with high CPU overhead and low queue depths (single-threaded).
The Standard: SQL01 (the healthy VM) is using SCSI, which is multithreaded and optimized for virtualization.
The Fix (Steps):
Navigate to the VM list in Prism.
Select SQL02 and click Update (or Edit).
Scroll down to the Disks section.
Identify the data disk(s). You will see the Bus Type listed as IDE or SATA.
Do not delete the VM. instead, perform a disk conversion (destructive change to the disk is allowed, but we want to keep the data).
Method to Convert (Clone to SCSI):
Hover over the IDE/SATA disk to see the path/filename of the vDisk (or write it down).
Click Add New Disk.
Operation: select Clone from ADSF file.
Path: Browse to the storage container and select the file associated with the current IDE disk.
Bus Type: Select SCSI (This is the critical fix).
Index: Ensure it doesn't conflict with existing disks (usually index 1 or higher for data).
Click Add.
Once the new SCSI disk is added, find the original IDE/SATA disk and click the X to remove it.
Click Save.
Note: You do not need to power on the VM to verify. The change from IDE to SCSI allows the VM to use the Nutanix VirtIO drivers for maximum storage performance.
NEW QUESTION # 19
Task 13
The application team is reporting performance degradation for a business-critical application that runs processes all day on Saturdays.
The team is requesting monitoring or processor, memory and storage utilization for the three VMs that make up the database cluster for the application: ORA01, ORA02 and ORA03.
The report should contain tables for the following:
At the cluster level, only for the current cluster:
The maximum percentage of CPU used
At the VM level, including any future VM with the prefix ORA:
The maximum time taken to process I/O Read requests
The Maximum percentage of time a VM waits to use physical CPU, out of the local CPU time allotted to the VM.
The report should run on Sundays at 12:00 AM for the previous 24 hours. The report should be emailed to [email protected] when competed.
Create a report named Weekends that meets these requirements
Note: You must name the report Weekends to receive any credit. Any other objects needed can be named as you see fit. SMTP is not configured.
A: Click Next.
Click on Add to add this custom view to your report. Click Next.
Under the Report Settings option, select Weekly from the Schedule drop-down menu and choose Sunday as the day of week. Enter 12:00 AM as the time of day. Enter [email protected] as the Email Recipient. Select CSV as the Report Output Format. Click Next.
Review the report details and click Finish.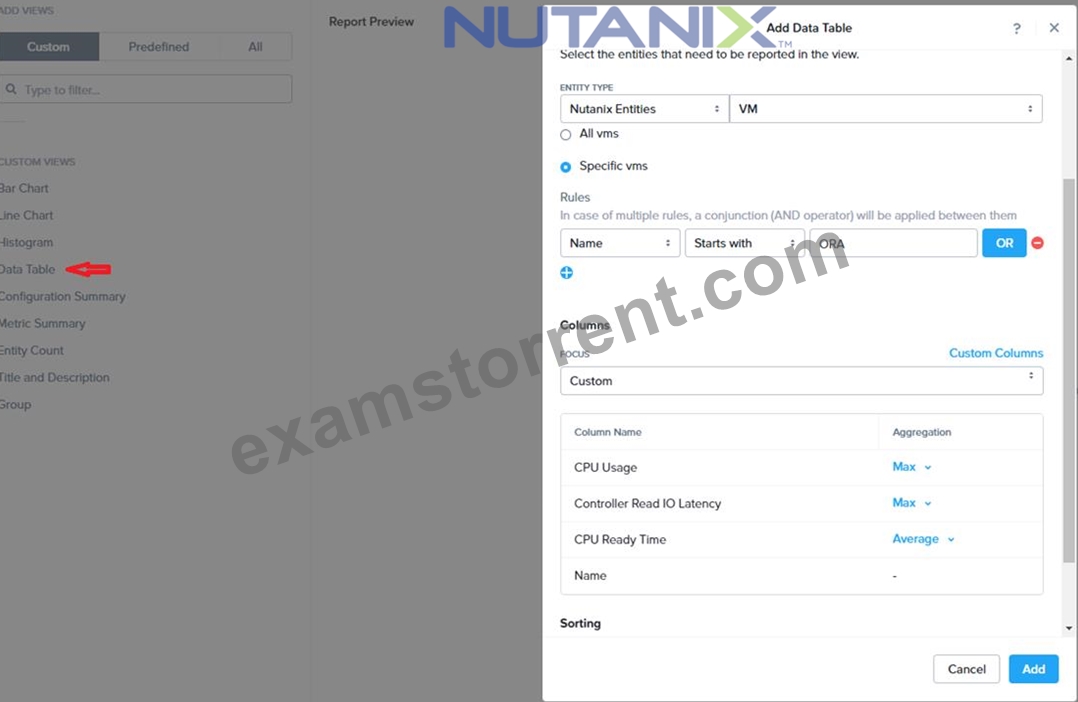
Answer:
Explanation:
See the Explanation for step by step solution
Explanation:
To create a report named Weekends that meets the requirements, you can follow these steps:
Log in to Prism Central and click on Entities on the left menu.
Select Virtual Machines from the drop-down menu and click on Create Report.
Enter Weekends as the report name and a description if required. Click Next.
Under the Custom Views section, select Data Table. Click Next.
Under the Entity Type option, select Cluster. Click Next.
Under the Custom Columns option, add the following variable: CPU Usage (%). Click Next.
Under the Aggregation option for CPU Usage (%), select Max. Click Next.
Under the Filter option, select Current Cluster from the drop-down menu. Click Next.
Click on Add to add this custom view to your report. Click Next.
Under the Custom Views section, select Data Table again. Click Next.
Under the Entity Type option, select VM. Click Next.
Under the Custom Columns option, add the following variables: Name, I/O Read Latency (ms), VM Ready Time (%). Click Next.
Under the Aggregation option for I/O Read Latency (ms) and VM Ready Time (%), select Max. Click Next.
Under the Filter option, enter ORA* in the Name field. This will include any future VM with the prefix OR
NEW QUESTION # 20
Task 12
An administrator needs to create a report named VMs_Power_State that lists the VMs in the cluster and their basic details including the power state for the last month.
No other entities should be included in the report.
The report should run monthly and should send an email to [email protected] when it runs.
Generate an instance of the report named VMs_Power_State as a CSV and save the zip file as DesktopFilesVMs_Power_state.zip Note: Make sure the report and zip file are named correctly. The SMTP server will not be configured.
Answer:
Explanation:
See the Explanation for step by step solution
Explanation:
To create a report named VMs_Power_State that lists the VMs in the cluster and their basic details including the power state for the last month, you can follow these steps:
Log in to Prism Central and click on Entities on the left menu.
Select Virtual Machines from the drop-down menu and click on Create Report.
Enter VMs_Power_State as the report name and a description if required. Click Next.
Under the Custom Views section, select Data Table. Click Next.
Under the Entity Type option, select VM. Click Next.
Under the Custom Columns option, add the following variables: Name, Cluster Name, vCPUs, Memory, Power State. Click Next.
Under the Time Period option, select Last Month. Click Next.
Under the Report Settings option, select Monthly from the Schedule drop-down menu. Enter [email protected] as the Email Recipient. Select CSV as the Report Output Format. Click Next.
Review the report details and click Finish.
To generate an instance of the report named VMs_Power_State as a CSV and save the zip file as DesktopFilesVMs_Power_state.zip, you can follow these steps:
Log in to Prism Central and click on Operations on the left menu.
Select Reports from the drop-down menu and find the VMs_Power_State report from the list. Click on Run Now.
Wait for the report to be generated and click on Download Report. Save the file as DesktopFilesVMs_Power_state.zip.
1. Open the Report section on Prism Central (Operations > Reports)
2. Click on the New Report button to start the creation of your custom report
3. Under the Custom Views section, select Data Table
4. Provide a title to your custom report, as well as a description if required.
5. Under the Entity Type option, select VM
6. This report can include all as well as a selection of the VMs
7. Click on the Custom Columns option and add the below variables:
a. Name - Name of the listed Virtual Machine
b. vCPUs - A combination of the vCores and vCPU's assigned to the Virtual Machine c. Memory - Amount of memory assigned to the Virtual Machine d. Disk Capacity - The total amount of assigned virtual disk capacity e. Disk Usage - The total used virtual disk capacity f. Snapshot Usage - The total amount of capacity used by snapshots (Excluding Protection Domain snapshots)
8. Under the Aggregation option for Memory and Disk Usage accept the default Average option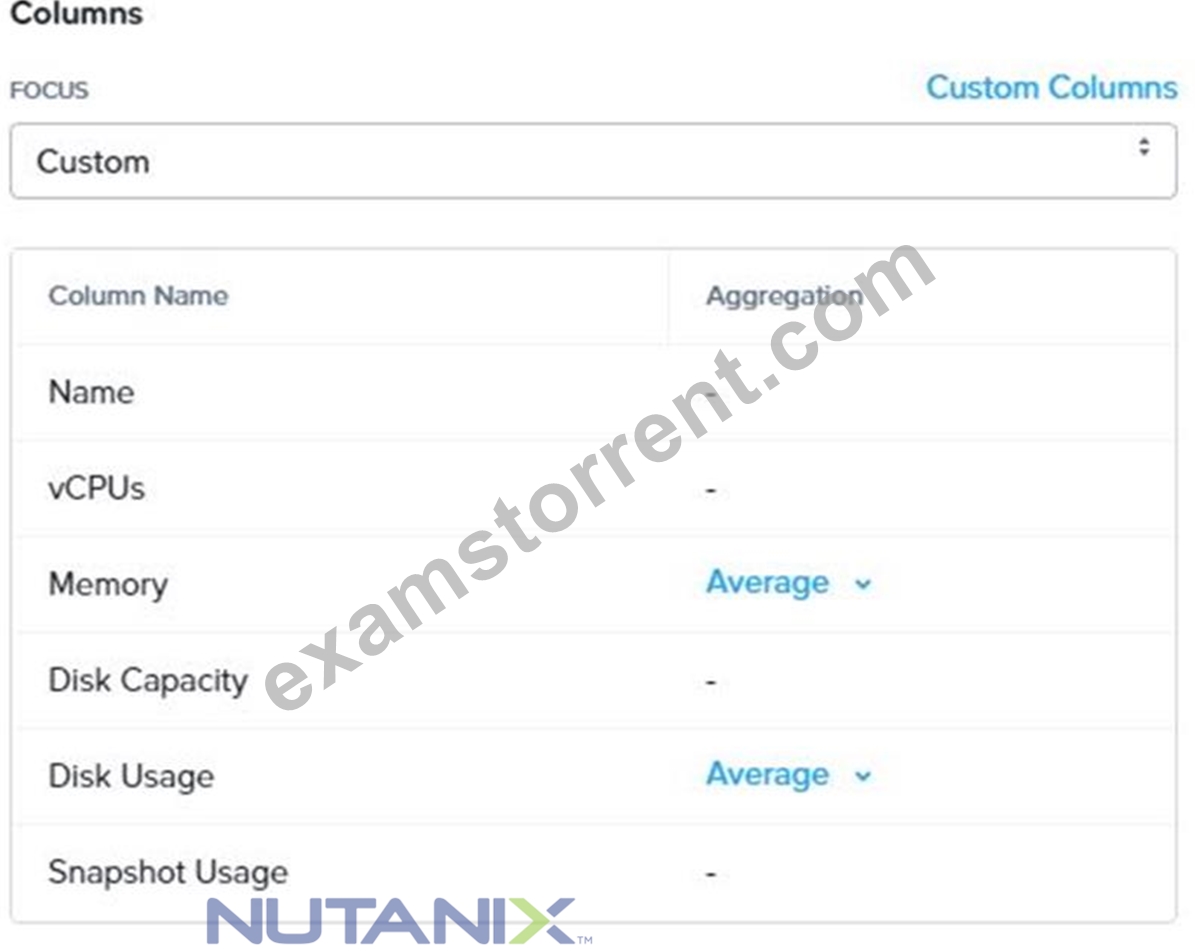
9. Click on the Add button to add this custom selection to your report
10. Next click on the Save and Run Now button on the bottom right of the screen
11. Provide the relevant details on this screen for your custom report: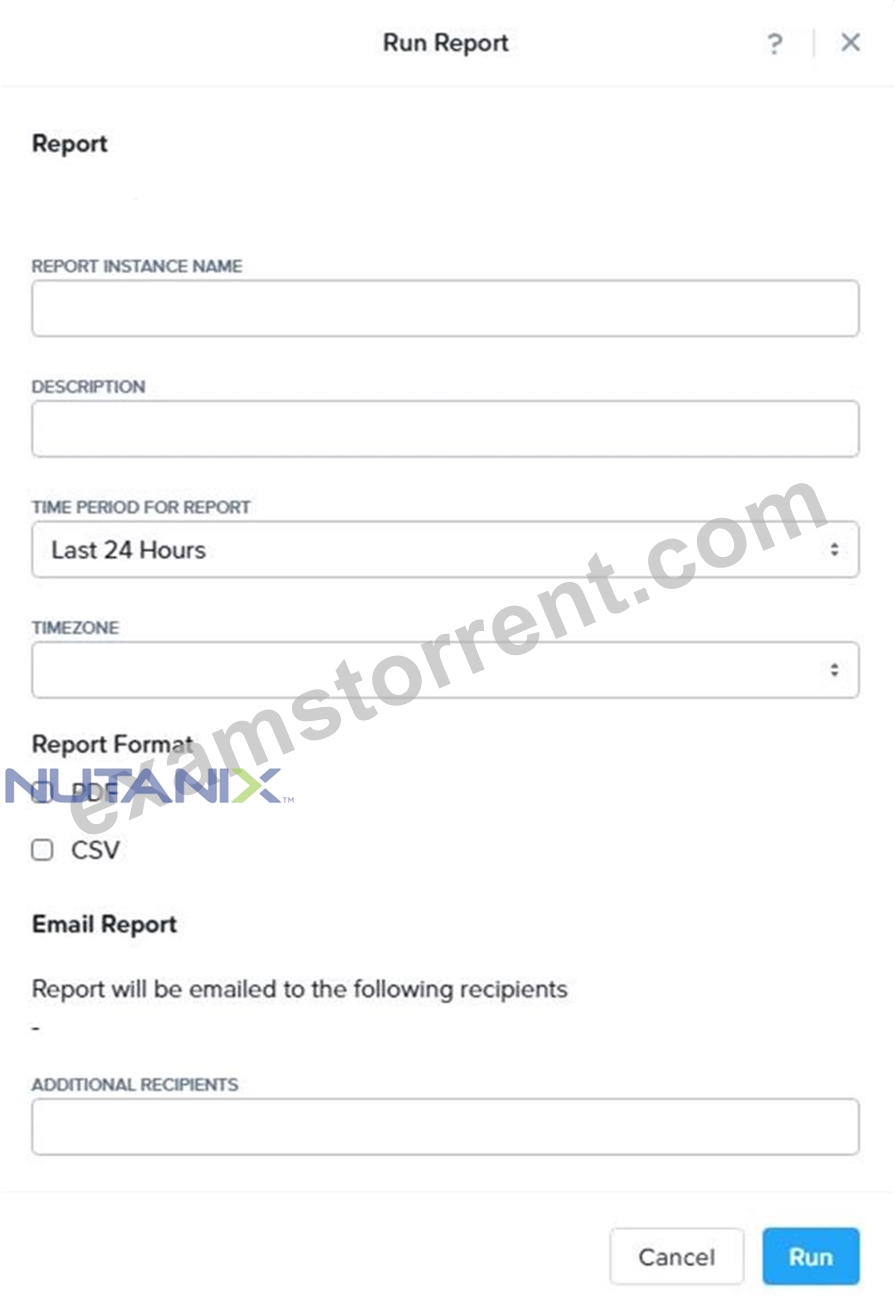
12. You can leave the Time Period For Report variable at the default of Last 24 Hours
13. Specify a report output of preference (PDF or CSV) and if required Additional Recipients for this report to be mailed to. The report can also simply be downloaded after this creation and initial run if required
14. Below is an example of this report in a CSV format:
NEW QUESTION # 21
......
Our NCM-MCI practice torrent offers you more than 99% pass guarantee, which means that if you study our materials by heart and take our suggestion into consideration, you will absolutely get the certificate and achieve your goal. On the other hand, You can free download the demo of our NCM-MCI Study Guide before you buy our NCM-MCI exam questions. Meanwhile, if you want to keep studying this NCM-MCI study guide, you can enjoy the well-rounded services on NCM-MCI test prep.
Latest NCM-MCI Test Cost: https://www.examstorrent.com/NCM-MCI-exam-dumps-torrent.html
- NCM-MCI Exam Labs - Valid Latest NCM-MCI Test Cost Bring you the Best Products for Nutanix Certified Master - Multicloud Infrastructure v6.10 ???? Search for 【 NCM-MCI 】 and download it for free on ( www.easy4engine.com ) website ℹNCM-MCI Book Pdf
- Free PDF 2026 Unparalleled Nutanix NCM-MCI Exam Labs ???? Copy URL 《 www.pdfvce.com 》 open and search for 《 NCM-MCI 》 to download for free ????NCM-MCI Book Pdf
- Top NCM-MCI Exam Labs | Efficient Nutanix Latest NCM-MCI Test Cost: Nutanix Certified Master - Multicloud Infrastructure v6.10 ???? Search for 【 NCM-MCI 】 and download it for free immediately on ➥ www.prepawayete.com ???? ????NCM-MCI Pass Test
- Nutanix NCM-MCI Exam Questions Updates Are Free For 1 year ???? Search on ▶ www.pdfvce.com ◀ for { NCM-MCI } to obtain exam materials for free download ????NCM-MCI Premium Exam
- New NCM-MCI Exam Pdf ???? NCM-MCI Latest Exam Experience ???? Exam NCM-MCI Fees ???? Easily obtain ➠ NCM-MCI ???? for free download through ✔ www.testkingpass.com ️✔️ ????New NCM-MCI Exam Pdf
- Valid NCM-MCI Premium VCE Braindumps Materials - Pdfvce ???? Immediately open ⇛ www.pdfvce.com ⇚ and search for ➥ NCM-MCI ???? to obtain a free download ????NCM-MCI Related Content
- Real Nutanix NCM-MCI Questions - Verified By Experts ???? Immediately open ( www.exam4labs.com ) and search for 【 NCM-MCI 】 to obtain a free download ⚖Reliable NCM-MCI Exam Materials
- NCM-MCI Accurate Prep Material ???? Test NCM-MCI Dump ???? Exam NCM-MCI Fees ???? Open website ▷ www.pdfvce.com ◁ and search for 《 NCM-MCI 》 for free download ????Dumps NCM-MCI Discount
- NCM-MCI Pass Test ???? Latest NCM-MCI Exam Camp ◀ Latest NCM-MCI Exam Camp ???? Search for “ NCM-MCI ” and download it for free immediately on ➡ www.practicevce.com ️⬅️ ????New NCM-MCI Study Materials
- Free PDF 2026 Unparalleled Nutanix NCM-MCI Exam Labs ???? The page for free download of ▷ NCM-MCI ◁ on ▛ www.pdfvce.com ▟ will open immediately ????Latest NCM-MCI Exam Camp
- Nutanix NCM-MCI Exam Questions Updates Are Free For 1 year ☃ Search for 【 NCM-MCI 】 and download it for free immediately on “ www.practicevce.com ” ????NCM-MCI Latest Braindumps
- binksites.com, jayafgrz395117.wikimillions.com, real-directory.com, deweyoqzs112836.wikiannouncement.com, monicaslsg918656.therainblog.com, larapafc847089.estate-blog.com, haseebmmlq324986.bimmwiki.com, harmonyuowb563989.homewikia.com, reallivesocial.com, amberobrf712133.blognody.com, Disposable vapes
What's more, part of that ExamsTorrent NCM-MCI dumps now are free: https://drive.google.com/open?id=1hVqpzulM0phCxESNOBxkZNp7NJK0KW5-
Report this wiki page